
Every van solar guide tells you to buy more panels than you think you need. None of them mention that your roof has already decided the answer, and that the last panel you add probably costs you a fan.
I’ve had three 100W panels on a ProMaster since 2018. When I went looking for the upgrade, I assumed eight years of technology would hand it to me: same three mounting spots, way more watts. That is not how it worked out, and the reason is worth understanding before you drill anything.
Panels Did Not Get Twice As Good#
Here is the arithmetic nobody runs. A solar panel is rated at 1,000 watts per square meter of sunlight, so if you know a panel’s dimensions and its wattage, you know its real efficiency.
My 2018 Renogy 100W slim is 42.2 × 19.6 inches. Spec That’s 0.53 square meters, so 100W in that area is 18.7% module efficiency.
Renogy’s current small panel, the 16BB N-type, is 34.1 × 22.8 inches and still rated 100W. Spec That’s 0.50 square meters, which works out to 19.9%.
That’s the whole eight years: 1.2 percentage points. And look at what the manufacturer did with the gain. They didn’t sell a 118W panel in the old size. They shrank the panel and kept the round number, because “100W” is what people shop for.
Drop that best-in-class efficiency back into my exact 2018 footprint and you’d get 106W. Even at the 25% the best commercially available modules now reach, Spec that rectangle tops out near 133W. For a 180W panel to fit there you’d need 34% module efficiency, and no commercial silicon module is remotely close.
And that 25% is not a panel you can put on a van. It is Aiko’s back-contact ABC module, a large-format residential and utility panel that hit 25% in mass production in 2026. Spec The best 12V van panel you can actually order sits closer to 20%. The ceiling I am describing is the one physics allows, and my real options are well under it.
The marketing number is not the panel number#
You will see “25% efficiency” on panels like the one above. On a 12V van panel that is the cell rating, measured on a bare square of silicon. A finished module has an aluminum frame, gaps between cells, and busbars, all of which occupy area and produce nothing. The module rating typically lands two to five points below the cell rating.
Here is what makes it genuinely confusing in 2026: a real 25% module now exists. It is just not the panel in the listing you are reading. Renogy’s N-type 200W advertises “up to 25%” and works out to 20.7% once you divide its 200W by its 49.69 × 30.08 inch body. Spec Same headline number, four and a half points apart.
So when you’re comparing panels, ignore the headline and do what I just did: divide watts by area. It takes ten seconds and it is the only number that tells you what will actually fit on your roof.
What Actually Improved#
Silicon is near its ceiling, and that isn’t a manufacturing problem, it’s physics. A single-junction silicon cell has a hard theoretical limit in the high twenties to low thirties percent. Spec The best silicon cells ever made in a lab sit around 27%. Commercial modules reached 25% in mass production in 2026, Spec which puts the best panel you can buy within about two points of the best cell anyone has ever built. That is the end of the road, not a waypoint on it. There was never a doubling waiting in the wings.
What did get dramatically better is cost per watt. Panels are a commodity now in a way they weren’t in 2018. That is a real and useful change, but notice what it means: the affordable upgrade path is more panels, not denser ones. Which brings the problem back to your roof.
The next genuine density jump needs perovskite tandem cells, which reach into the low thirties in the lab but are not yet in durable, warrantied 12V panels you’d bolt to a van. Don’t plan a build around them.
Now Do It On Your Roof#
This is where it stops being abstract, and where the internet’s advice stops being useful. Panel dimensions are published, so you can plan on paper:
- A 100W slim panel is 42.2 × 19.6 inches.
Spec - A roof fan needs a 14 × 14 inch opening, with a flange closer to 16 inches square.
Spec
What those numbers don’t tell you is how they’ll actually pack onto your roof, because that depends on panel orientation, the flat width between your roof rails, where your fans have to sit for airflow, and whatever your rack feet and existing vents already occupy. Total roof length is the number people plan with, and it’s the one that misleads them.
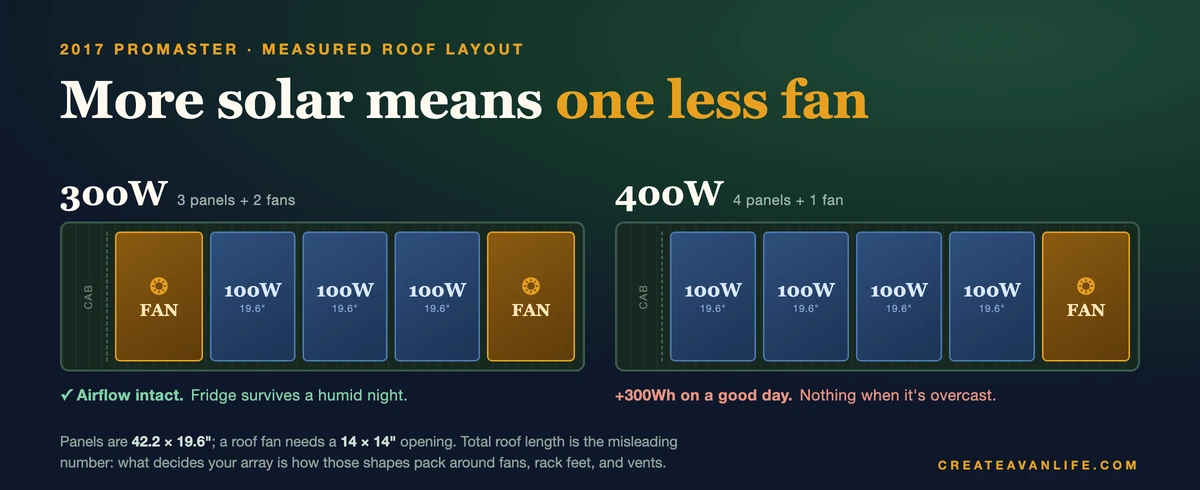
On our 2017 ProMaster, with a Vantech low-profile rack and two Maxxair fans, the layout resolves two ways:
- Three panels and two fans (300W)
- Four panels and one fan (400W)
That’s measured on our roof, not calculated from the wheelbase. Your van will give you a different pair of options, and the only way to know is to get up there with a tape measure and lay it out full-size before you buy a single panel.
Why I keep the fan#
A fourth panel is worth about 300Wh on a good day: 100W at a realistic 0.75 derate across four peak sun hours. Estimate That sounds like a lot until you ask which days you actually need help on.
The bad days are hot and overcast at the same time. My chest fridge pulls 20 to 25Wh per hour in Florida heat and humidity against 10 to 12 in mild weather, Measured so the load nearly doubles on exactly the days the panels give back the least. A fourth panel adds nothing on an overcast day. It’s the good days that get better, and the good days were already fine.
Meanwhile a roof fan on high draws 32W, measured on my own fan at speed 10. Measured That’s a real load, but it’s the difference between sleeping and not sleeping in a humid van, and it’s what keeps the fridge from fighting a 100-degree interior. Deleting a fan to add a panel makes the good days slightly better and the worst days meaningfully worse. That’s a bad trade in any climate with summer.
Run Your Own Layout Before You Buy#
Do this before you spend a dollar on panels:
- Measure your usable roof. Not the vehicle length. The flat area behind the cab, inside the rails, minus anything already mounted.
- Place your fans first. Decide how many you need for your climate, then put them where they belong for airflow, which usually means one forward and one aft rather than side by side.
- Fill what’s left with panels, using real published dimensions rather than the wattage.
- Divide watts by area on every panel you’re considering, and pick the highest number.
- Keep a standoff. Mine sit 1 to 2 inches off the roof, and that air gap matters: output drops roughly 0.3 to 0.5% per degree Celsius above 25°C,
Specand a gap lets air carry heat away instead of letting the cells cook against hot sheet metal. Panels laminated flush to the roof run hotter and harvest less. - Wire for one more panel than you install, in case a future layout change frees up space. Wire and a controller are cheap; re-running them is not.
When The Roof Runs Out#
Here’s the part that reframed my whole build. If your array is capped by geometry and your daily load isn’t shrinking, then harvest is a solved problem and recovery isn’t.
Flat panels on a van roof realistically return 60 to 75% of their rating. Spec At 300W that’s roughly 900Wh on a strong summer day, 675Wh on a 3-hour fall day, and 450Wh under heavy overcast. Estimate A realistic full-time load with a fridge runs 1,000 to 1,500Wh a day. The math doesn’t close, and one more panel doesn’t close it either.
What does close it is putting power back fast when you do have a source. A DC-to-DC alternator charger moves up to 1,200W of alternator and solar combined while the engine runs, Spec which is four times what my entire roof is rated for. An hour of driving beats a cloudy day of harvesting, every time.
So budget the roof for what it holds, then spend the rest of the money on recovery speed. The panels set your ceiling. How fast you can refill is what actually keeps you out of trouble.
Related Reading#
- Eight Years on 300W of Solar: What I’d Change
- Solar Power for Van Life Beginners, panel types, mounting, and the mistakes that cost the most
- How Much Solar Do You Need in a Van?
- Solar Input Explained for Portable Power Stations
- The Alternator Charger That Changed How We Power Our Van
- Best Van Roof Fans, Tested