
CRL T-Vent windows were a one-argument purchase. We both wanted T-vents over sliding windows, and Karlee was pushing for them early. Where we disagreed was how many: she figured the sliding-door side was enough, and I pushed for both walls. Eight years in, both walls was the right call, and the argument was shorter than the payoff.
If you’re building a full-time ProMaster and you’re running a roof fan, the windows are how the fan actually moves air. A sealed van with one fan has nothing to pull from. T-vent windows on both walls turn the cabin into a cross-flow channel, and the difference is the kind you feel the first hot night.
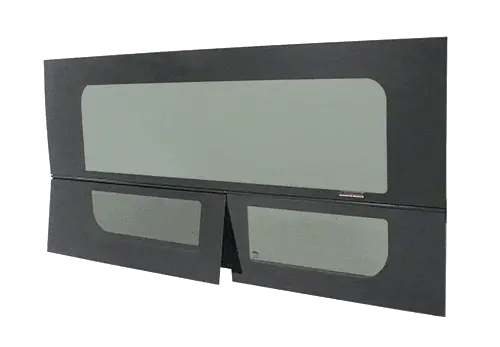 CRL T-Vent Window (ProMaster)
Check Current T-Vent Pricing
CRL T-Vent Window (ProMaster)
Check Current T-Vent PricingQuick Verdict
Skip if: you’re committed to a fully stealth exterior with no visible windows, or your van is a weekend rig where buttoned-up sealing is fine for short stays.
Are T-Vent windows the right call for your ProMaster?#
Tap the situation that sounds like you.
🌴 Full-time, hot or humid climates: Florida, Gulf, desert summers. Both sides T-vent
This is exactly what these windows are for. In Florida summer the only thing that makes the van livable at night is real cross-flow: air pulled in one wall, exhausted out the other through the fan. Both sides T-vent is the configuration that works. One window is half the system.
🔨 Building from scratch, haven't cut walls yet. Do it now
Cutting windows during the build is dramatically easier than retrofitting later. Walls are open, you can see your framing, you can place the cuts cleanly. Retrofit means working around insulation, paneling, and electrical that's already in. If you're at the build stage and already planning a roof fan, install the windows in the same phase. Future-you will not regret it.
🔒 Stealth-first build, visible exterior matters. Tradeoff to weigh
T-vent windows are visible from the outside. They look fine (clean glass, factory-style fit) but they do change the silhouette. Our ProMaster is black, and the windows still let it pass for a work van in most parking situations, but it's no longer a blank panel. If your stealth strategy depends on zero windows, skip these and lean harder on the roof fan and door venting.
🪟 Already have one window, debating the second. Add the second
We had this debate during our build: one side or both. Cross-flow is the entire point: air has to enter from one side and exit from the other for a fan to move it. With one window, the fan creates a pressure differential and gives up. With two, you have a working channel. Eight years in, we can feel the difference on any given night just by cracking one window versus both. And if you already have one installed, the second is the cheaper cut; your confidence with the jigsaw is already built.
How T-Vent windows work with the roof fan#
Why T-vent instead of a slider +
Sliding windows look simpler and you see them more often in van builds. But sliding windows leave a screen in the open path the whole time the window is open: debris, rain, bugs. T-vent windows crank outward like a top-vent awning, so the glass itself becomes a small overhang. You can leave them open in light rain. The crank mechanism feels more like a fixed window operating part-time than a sliding window operating full-time. It is not immortal, though: the crank mechanism on our sliding-door window failed about two years ago, roughly six years into daily use, and I replaced it myself with a rivnut tool. **Notice which one went.** The sliding-door side is the window we open by far the most, and the other one has never needed anything. What wore out was the mechanism doing the work, not a part that fails sitting still, which is the distinction that tells you whether a component is badly made or just used. One crank in eight years, on the busier of two windows, and a mechanism you can swap in an afternoon is a different problem from a slider that has worn out the track it rides in.
Karlee raised T-vents first and I agreed quickly, so sliders never really got a hearing here. The one we argued about was how many, not which style, and that argument is above.
Both sides, not just one: the call I won +
Karlee figured one window on the sliding-door side would do it. My worry was airflow: a roof fan with only one intake pulls air from any leak it can find (door seals, cab gaps) instead of moving it through the cabin. We cut both during the build, and eight years of hot nights have settled it. Crack one window and the fan works at a fraction of itself. Crack both and you feel a real draft move the length of the van.
Two T-vent windows + a MaxxFan is the configuration that works. One window is a half-system that costs more in suffering than the second window costs in dollars.
The windows are how the roof fan works +
Reframe before buying: don't think of the windows as a separate ventilation upgrade. Think of them as the air-intake half of your roof fan system. A 900 CFM fan rating assumes the fan can pull 900 CFM from somewhere, and a sealed van can't supply that. The fan's real-world performance is gated by your air-in path. Windows on both walls open that path wide.
If you're budgeting and you already bought the fan, the windows are not optional accessories. They're the second half of the same purchase.
Cutting walls is a one-way decision, so measure twice +
The install isn't bad, but the cuts are permanent. Take time on placement: clear the inside of any framing, electrical, or insulation runs you don't want to hit. Mark the cut on both interior and exterior. Use a metal cutting blade, not a generic jigsaw blade. The wrong blade chews the steel and leaves jagged edges that won't seal cleanly.
Sealant is the other do-it-once thing. We used butyl tape behind the flange and a marine-grade sealant around the perimeter. Eight years of weather, no leaks. Don't rush the sealant. A leak around a window is way harder to fix than around a roof fan because the water tracks down the wall through the insulation before you see it.
Specs (for reference)#
The number most people miss until they are already committed: these are $770 to $900 per window, and cross-flow needs two of them. Budget for the pair.
| Spec | FW395R (passenger, sliding door) |
|---|---|
| Glass size | 44-11/16″ × 26-1/8″ (1,135 × 664 mm) |
| Weight | 40 lbs each |
| Glass | 28% dark gray tempered safety glass |
| Opening | Crank-out T-vent, tilts to about 45° |
| Mounting | Clamp-in ring, no adhesive |
| Included | Detachable screen |
| Fits | 2014+ ProMaster, 136″ / 159″ / 159″ EXT, medium or high roof |
Part numbers matter when you order. FW395R is the passenger-side sliding door. FW392L is the driver-side front. They are not interchangeable and the side is baked into the part number, so check it twice before you buy a $900 piece of glass. Both fit 2014+ ProMaster in 136″, 159″ and 159″ EXT wheelbases with a medium or high roof, and both are made in the USA by C.R. Laurence.
Two things the listings bury. These do not replace factory glass – they are for cutting into a blank cargo panel, so if your van already has a window there this is not the part. And they are clamp-in, not adhesive: a clamp ring pulls the frame tight against the cut edge, which is why the install is a cut-and-seal job rather than a bonding job. A detachable screen is included.
Ours went in eight years ago, so I have not paid current prices. Everything above is published spec and retail pricing as of August 2026, not something I measured.
Glass cranks outward like a top-hinged awning. Stays partially open in light rain. Different mechanism from sliding windows, better for full-time use because the open glass acts as a small overhang.
One window opens. Two windows on opposite walls create cross-flow. For full-time use with a roof fan, both sides is the configuration that works; one is a half-system.
Requires cutting through the van wall. Easier during the build than as a retrofit. Sealing is the make-or-break: leaks track down through insulation before you see them.
Frequently asked#
T-vent or sliding window: what's the difference for full-time? +
T-vent cranks outward, so the glass becomes a small awning when open. Sliding windows leave a screen in the open opening with no overhead protection. For full-time van life, T-vent's ability to stay open in light rain matters more often than people predict. Karlee called this one before we installed, and she's been right every rainy night since.
Can I get away with one window if I have a roof fan? +
You can, for occasional use in mild conditions. For full-time use in hot climates, no. The fan needs an air-in path on the opposite side of the van for cross-flow to work. We run both, and the difference between opening one window and opening two is obvious on any warm night.
How hard is the install? +
Cutting through the van wall is intimidating but the process is well-documented. Hardest part is committing to the cut location: measure inside framing carefully. Use a proper metal-cutting blade. Take your time with the sealant and let it cure fully before testing for leaks. If you can install a roof fan, you can install these.
Do they affect stealth? +
Yes, T-vent windows are visible from the outside. The look is clean and factory-fitted, but the silhouette changes from "blank panel van" to "van with windows." Our black ProMaster still passes for a work van in most parking situations. If your stealth strategy depends on zero visible windows, these aren't the right upgrade.
The upgrade that turned our roof fan into a real ventilation system
Both sides, T-vent style: the configuration that works
CRL T-Vent Window (ProMaster)
Check Amazon Price →
Pair with the MaxxFan 7500